|
One of the more expensive maintenance items for motorcycling is tires. Your life could depend on them so they need to be in good shape. Unlike automobile tires that can get 40,000 miles and more, motorcycle tires wear out much more quickly. With the modern high technical compounds and techniques used in their manufacture, motorcycle tires offer great traction in all the conditions: fast, slow, wet, dry, hot, cold, smooth, rough etc The tradeoff for this fantastic traction is increased tire wear. Depending on the type, the conditions you ride in, and the “fun factor” you apply (twisting your wrist) tires can last as little as 2,000 miles and very seldom exceed 10,000 miles. So if you ride a lot you’ll be changing tires often. Modern high tech tires are not inexpensive. One tire often costs 3 to 4 times that of a comparable automobile tire, so prudent motorcyclists are usually looking for ways to cut their tire budgets. One way to do this is to purchase your tires through the internet and change them yourself. My first experience with motorcycles was as an off-road enduro rider and when tires wore out or needed to be replaced because of lack of traction I just took the wheel off, laid it on the ground and changed it using brute force and a few tire irons. This usually resulted in a few cuss words and some sore knuckles. It never entered my mind to take the bike to a shop to have the tires changed. After many years of dirt bike riding I purchased a wrecked Honda 350CL that I repaired for my first road bike. I didn’t ride it a lot as I was still heavily into dirt riding. Eventually I sold the 350 and moved on to bigger bikes and started riding on the road more often. That’s when I realized that tires were a major expense in my motorcycle habit. I found I could buy tires through the internet at much reduced cost and take them to a local independent shop to change and balance. When this shop went out of business I tried to have my tires mounted at the local motorcycle shops but found that they would only change tires if you bought the tires from them at a much higher cost. So I reverted back to changing them myself with a |
|
few modifications. I bought a tire balance stand, a bead breaker, put a bolt through a big piece of plywood for a support stand, made up some adapters for the wheel to fit on so I could clamp the wheel down, and used tire irons and plastic rim protectors, and again brute force. This was a labor intensive method but I persevered for a few years and improved my tire changing technique. Over time I found that I had accumulated several motorcycles so I was changing more and more tires. I looked at purchasing a Coats 220 tire changer but balked at the $800 plus cost. Then I heard about the Harbor Freight tire changer and bought the base unit and motorcycle adapter when they were on sale for less than $70. It took me a while to figure out how to use this machine to it’s full potential. I read articles about tire changing, experimented with various tools and methods, made some modifications to the tire changer itself, and today I have a process that is quick and easy and lets me change tires at my convenience. I’ve even installed new tires for a trip, saving the not totally worn out ones tires to use again. I usually keep a couple tires that are have a little tread left in the barn and on a few occasions have rescued fellow motorcyclists when they miscalculated their tire wear while riding in the mountains. On the two pages that follow borrowed from a friend he shows how use Harbor Freight tire changer. I also have this whole process documented with photos and descriptions in my SmugMug account. Go to http://tinyurl.com/2vjv52 double click on the first frame and page through the photos with descriptions. I always shop for the best prices but here’s a few places where I purchase tires; And don’t forget to navigate to my tire changing page with lot’s of pictures and descriptions: |
|
Want to Change Your Own Tires? by Doug Pippin |

|
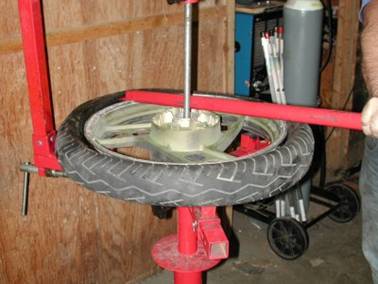
Tire Removal |
|
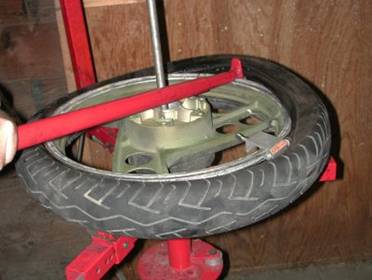
Clamp the rim and insert the rod through the hub into the hole beneath, then spray the bead generously with tire lube. Insert the flat end of the lever between the upper bead and the rim. |
|
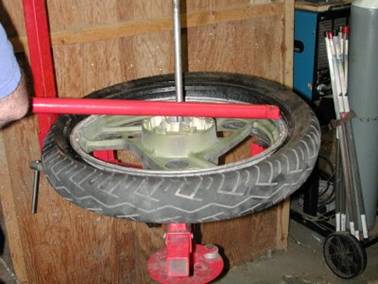
Lever the tire bead off the rim and lay the bar flat across the wheel, slide the bead off the rim by pivoting the lever on the rod. |
|
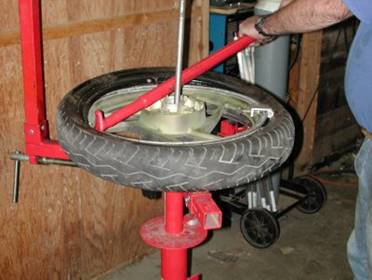
Continue around the rim until the top bead is off. Repeat with the bottom bead. Some tires' lower bead will come off by hand after a little prying with the bar. Remove the rod and the old tire. |
|
Tire Install |
|
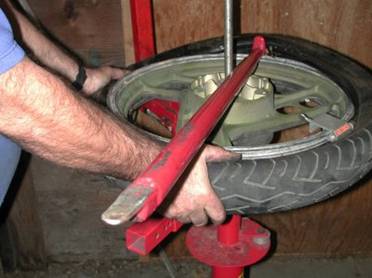
Continue around the rim with the lever. When it gets stubborn at the last six inches or so, you can lift the end of the bar, forcing the bead down past the rim edge with the flat tab you see sticking up in this picture. Remove the wheel from the clamps before inflating the tire or it'll grab the clamps and you can't get the wheel off them. Seat the bead of the new tire on the rim before installing the valve core - sometimes the core doesn't allow air into the tire fast enough to inflate an unseated tire. Somewhere between 20 and 40 psi you'll hear two loud pops. That's the bead seating on the rim. |
|
When the bead begins to be stubborn, stop and squeeze the tire, forcing both the upper and lower beads into the well of the rim. This will give you about a half inch more slack. |
|
Spray both beads with tire lube making sure you lube the inside of the tire bead, then shove the lower bead onto the rim. It will often go on with no tools, but a bit of prying may be necessary. Pay attention to the arrow on the tire. Line the painted dot on the tire sidewall up with the valve - this is the lightest spot on the tire, and the valve is presumably the heaviest spot on the rim. But not always. Start the top bead by hand, then apply a small clamp to keep it from slipping off the rim. Or you can use a tire iron with your third hand. Hook the curved part of the knuckle end of the bar over the rim, pivot the bar on the center rod, and work the bead onto the rim. |
|
This may not happen on tube-type rims, btw. If you're using a tube, powder it (baby powder) before installation. Once the bead has seated, deflate the tire and reinflate at least two more times to let the tube wiggle around inside the tire until it's straight. |